
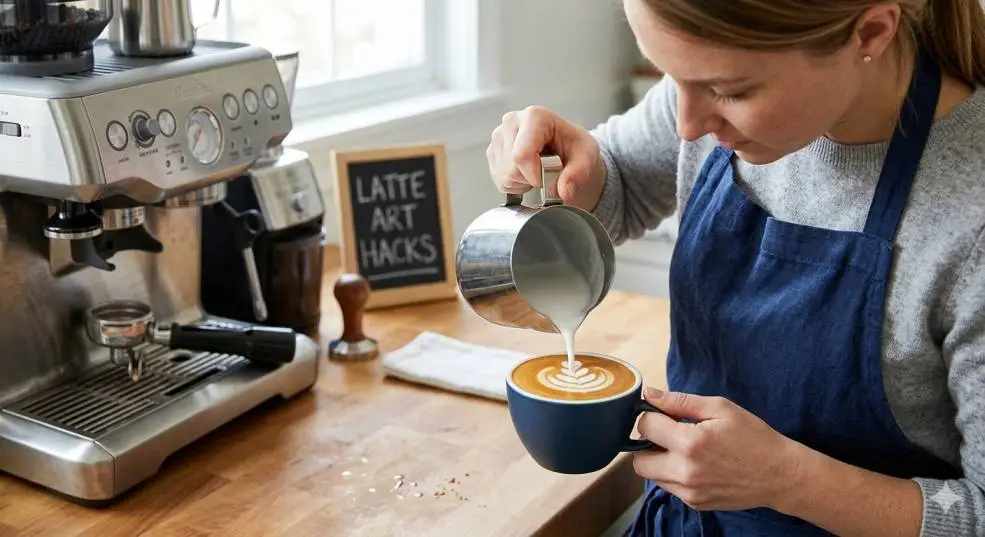
I bought my first espresso machine in 2019. A Breville Barista Express. I was so excited. I watched YouTube videos for weeks before it arrived.
The first time I tried to pour latte art, I got a white blob. Just a blob. No heart. No leaf. Nothing. I tried again. Another blob. I went through two gallons of milk that first month. My trash can was full of lumpy, foamy disasters.
I almost gave up. Then a barista friend came over. He watched me pour one time. He said, "Your milk is wrong. That is the whole problem. That changed everything.
Five years later, I can pour a decent rosetta. Not competition level. But good enough that my wife thinks I am fancy. I have made every mistake you can make. I have wasted gallons of milk. I have steamed milk so bad it looked like cottage cheese.
Here is what I learned. The home espresso machine latte art hacks that actually work are not about fancy tools. They are about fixing the basics. And most of them cost zero dollars.
Top 7 Best Home Espresso Machine Latte Art Hacks 2026
Hack 1: Stop Using the Wrong Milk
This was my biggest mistake. I was using skim milk. I thought it was healthier. It turns out skim milk makes terrible latte art.
I learned why from that barista friend. Milk fat stabilizes foam. Skim milk has almost no fat. The foam collapses almost instantly. You end up with a thin layer of bubbles that pour out as a shapeless mess.
I switched to whole milk. The difference was immediate. My foam went from soap bubbles to wet paint. That wet paint texture is what lets you draw.
What I use now: Whole milk. Organic if I can find it. I tried oat milk for a while because my sister is lactose intolerant. Oatly barista blend works. Regular oat milk does not. The barista blends have added fat and stabilizers.
What to avoid: Skim milk. Non-dairy milk that is not labeled barista blend. Anything that foams into big bubbles instead of microfoam.
What it costs: Whole milk is the same price as any other milk. The barista oat blends cost about a dollar more per carton. Worth it if you need dairy-free.
Hack 2: The Thermometer Trick
I did not use a thermometer for the first six months. I thought I could feel the temperature through the pitcher. I was wrong.
Milk needs to hit 140 to 150 degrees Fahrenheit. Too cold and the foam does not set. Too hot and the proteins break down. The milk separates. You get big bubbles and a burnt taste.
I bought a cheap thermometer for eight dollars. I clipped it to the side of my pitcher. The difference was night and day.
What I do: I steam until the thermometer reads 140. Then I stop. The milk keeps heating for a few seconds after I shut off the steam. It lands right at 145.
What I learned the hard way: If you go over 160, the milk is ruined. You cannot fix it. I have tried. Just dump it and start over.
What to buy: Any milk thermometer with a clip works. Do not buy the fancy infrared ones for home use. They are harder to use with a steaming pitcher.
Hack 3: The Swirl, Not the Whirl
I spent months trying to make a vortex in my milk pitcher. I watched videos where the milk spun like a tornado. I thought that was the goal. It is not. That is for commercial machines with powerful steam wands.
Read Also: Grinding Coffee Beans Pixel Art: Where Creativity Meets the Art of Coffee?
Home machines do not have that power. A barista at a local shop showed me the difference. She said, "You are not trying to spin the milk. You are trying to fold it.
She had me position the steam wand tip just below the surface. Not deep. Just below. I let it hiss for three seconds. That is the aeration phase. Then I buried the wand deeper and let it roll the milk. No violent spinning. Just a gentle rolling motion.
What I do now: I aerate for three seconds. I hear the paper-tearing sound. Then I lower the pitcher and let the milk roll. The whole process takes about twenty seconds on my machine.
What to watch for: The milk should look like wet paint when you are done. Not bubbly. Not flat. Shiny and smooth.
Hack 4: The Spoon for Beginners
This hack saved my sanity. When I first started, I could not get the foam to pour. I would tip the pitcher and a glob of foam would plop out first. Then thin milk. No control. A barista on Reddit suggested using a spoon. I thought it was cheating. I tried it anyway.
Here is how it works. You steam your milk. Then you take a spoon and hold back the foam. You pour the liquid milk into your espresso first. That fills the cup and creates a dark base. Then you spoon the foam on top and use the tip of the spoon to draw.
It is not true latte art. But it looks good. And it builds confidence. I used the spoon method for about three months. Then I slowly transitioned to free pouring. The spoon gave me time to understand how milk moves. When I finally switched to free pour, I had a much better feel for it.
What to buy: Any soup spoon works. I use a small metal spoon from my silverware drawer. Nothing special.
What to know: This is a training wheel. Use it to learn. Then take it off.
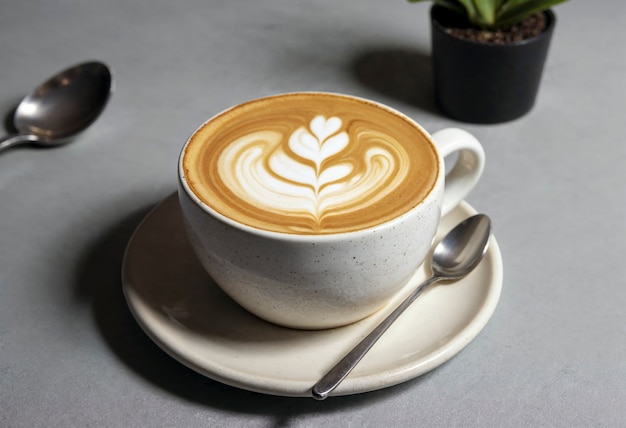
Hack 5: The Cup Shape Matters More Than You Think
I used to pour into wide, shallow bowls. I thought they looked nice. They are terrible for latte art. The shape of the cup controls how the milk flows. A wide cup spreads the milk out fast. You lose definition. A narrow, rounded cup gives you more control.

I learned this from a barista competition video. The competitors all use specific cups. They are not being snobby. The physics is real.
What I use now: Not Neutral Lino cups. They are expensive. About twenty dollars each. But they are the right shape. Rounded bottom. Slightly tapered sides. The milk flows naturally into a design.
What to avoid: Flat-bottomed mugs. Bowls. Anything with straight sides.
What to buy if you are on a budget: Duralex Picardie glasses. They are cheap. About five dollars each. The shape works surprisingly well. I used these for two years before I bought the fancy cups.
Hack 6: The Tap and Swirl
I learned this hack from a YouTube video. It is simple. But it fixes a lot of problems. After you steam the milk, tap the pitcher on the counter. Just once. Hard enough to break any large bubbles. Then swirl the milk in a circle. This mixes the foam and liquid together.
I skipped this step for months. My milk would separate. The foam sat on top. The liquid sat on bottom. When I poured, the foam came out first and ruined the pour. Now I tap and swirl every time. It takes three seconds. It makes a huge difference.
What to watch for: The milk should look uniform after you swirl. No layer of foam sitting on top.
Hack 7: The Practice Pitcher of Water
This hack cost me nothing. It taught me more than any video. I filled my milk pitcher with water. I added a drop of dish soap. The soap creates foam when you steam it. Not the same as milk. But close enough to practice the motion.
I practiced the pour over and over. I watched the water move. I learned how tilt affects flow. I learned how fast to pour. When I switched back to real milk, my control was better. Not perfect. But noticeably better.
What to do: Fill the pitcher halfway with cold water. Add a drop of dish soap. Steam like normal. Pour into a cup. Dump and repeat.
What to know: This does not taste good. Do not drink it. Use it for practice only.
Hack 8: The Espresso Base Matters
I ignored my espresso for a long time. I thought latte art was all about milk. Wrong. The espresso needs to have crema. Crema is the brown foam on top of a good shot. It gives contrast. Without crema, your milk just blends in.
You get a light brown blob instead of a dark background with white art. I learned this when I switched to fresh beans. My local roaster told me to use beans roasted within the last two weeks. Old beans have no crema. The shot pulls fast and watery.
What I do now: I buy beans from a local roaster. I use them within two weeks of the roast date. I grind right before pulling the shot. The crema is thick and dark.
What to avoid: Grocery store beans with no roast date. Pre-ground coffee. Both will give you weak crema.
Hack 9: The Pour Height Secret
This one took me forever to figure out. I was holding the pitcher too high. The milk dropped into the cup and sank. No design.
Then I learned the rule. Start high to break through the crema. Then get low to draw.
I start with the pitcher about four inches above the cup. I pour fast at first. The milk goes under the crema. The cup fills from the bottom. Then I drop the pitcher spout right down to the surface. Almost touching the coffee. Then I slow the pour and start my design.
What to watch for: The pitcher spout should touch the coffee surface when you are drawing. That is how the milk floats instead of sinking.
Hack 10: The One Design Method
I wanted to learn every design. Heart. Rosetta. Tulip. Swan. I tried them all. I failed at them all. A barista told me to pick one design. Just one. Learn it perfectly. Then move on.
I picked the heart. I poured hearts for six months. Hundreds of hearts. Hearts every morning. By the end, I could pour a heart with my eyes closed.
Then I learned the rosetta. It took me two weeks because I already understood milk flow from the heart practice.
What I recommend: Start with a heart. It is the simplest. Learn it until you can do it consistently. Then try a tulip. Then a rosetta. Do not jump around.
What I Learned About Equipment?
I used to think I needed a better machine. I blamed my Breville. I thought if I had a La Marzocco, I would suddenly pour perfect art. Then I went to a coffee shop and watched a barista pour a perfect rosetta on a machine older than me.
The machine was dirty. The steam wand leaked. But his milk was perfect. The machine matters less than you think. The milk matters more.
What works: Any machine with a steam wand that produces consistent pressure. My Breville works fine. I have used a Rancilio Silvia. I have used a Gaggia Classic. All of them can pour latte art.
What does not work: Steam wands that spit water. If your steam wand spits, the milk gets watery. That is a machine problem. You can fix it by purging the wand before steaming. Purge for five seconds until only steam comes out.
What I Avoid Buying?
I wasted money on things I did not need. Here is what I skip now.
Etching tools. These are little sticks for drawing in foam. They are fine. But they do not teach you how to pour. I bought a set. Used them twice.
Pattern stencils. You sprinkle cocoa powder through a stencil. It looks nice. But it is not latte art. It does not help you learn milk texture.
Expensive pitchers. A twelve-dollar pitcher works the same as a forty-dollar pitcher. I have both. The expensive one is shinier. That is it.
The Timeline of My Failure
I think it helps to know how long this takes. I was not a natural.
Month one: Blobs. Nothing but blobs. I almost returned my machine.
Month three: I could pour a heart. Not pretty. But recognizable.
Month six: Consistent hearts. I could pour them without thinking.
Year one: Tulips. Not great. But people could tell what it was.
Year two: Rosettas. Finally. My first rosetta that actually looked like a leaf.
Year three: Consistency across all three designs.
I am not special. I just kept going.
Frequently Asked Questions
Can you make latte art without an espresso machine?
Yes, but it is harder. You need strong coffee with crema. A Moka pot can work. Instant coffee will not. The foam from a French press or a hand frother is usually too thick. You can still make patterns by spooning foam. But free pouring is hard without a steam wand.
What is the easiest design to start with?
The heart. You just pour and pull through. There is no wiggling. It teaches you the basics of milk flow.
Why does my milk always have bubbles?
You aerated too long or too aggressively. Try three seconds of aeration. Then bury the wand. Tap and swirl after steaming.
Why does my art disappear into the coffee?
Your milk is too thin. You did not aerate enough. Or you poured from too high. Drop the pitcher spout down to the surface.
What I Wish Someone Told Me?
I wish someone had told me to stop watching competition videos. Those baristas have years of practice and machines that cost more than my car. They are not helpful for beginners.
I wish someone had told me to use a thermometer. I wasted so much milk guessing. I wish someone had told me that the first pour is the hardest. Once you get one good heart, the rest come faster.
I make a latte every morning now. It takes me about four minutes from grinding to pouring. I pour a heart most days. Sometimes a rosetta if I am feeling fancy. It is not perfect. But it is mine.
My milk costs me about a dollar a day. My beans cost about fifty cents a shot. My machine is a Breville I bought five years ago.
You do not need expensive gear. You need good milk, fresh beans, and patience. And maybe a thermometer.