The iced coffee method nobody told you about
I love cold brew. I make it every week. But something always bothered me. Cold brew tastes flat. The brightness disappears. The fruity notes vanish. You get chocolate and nothing else.
Then a barista in Portland made me flash brew. One sip. Everything changed.
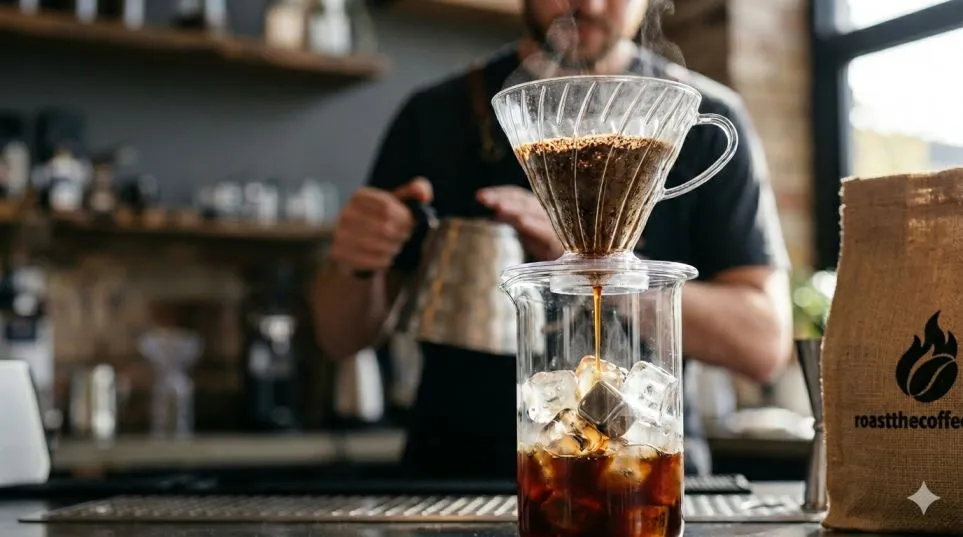
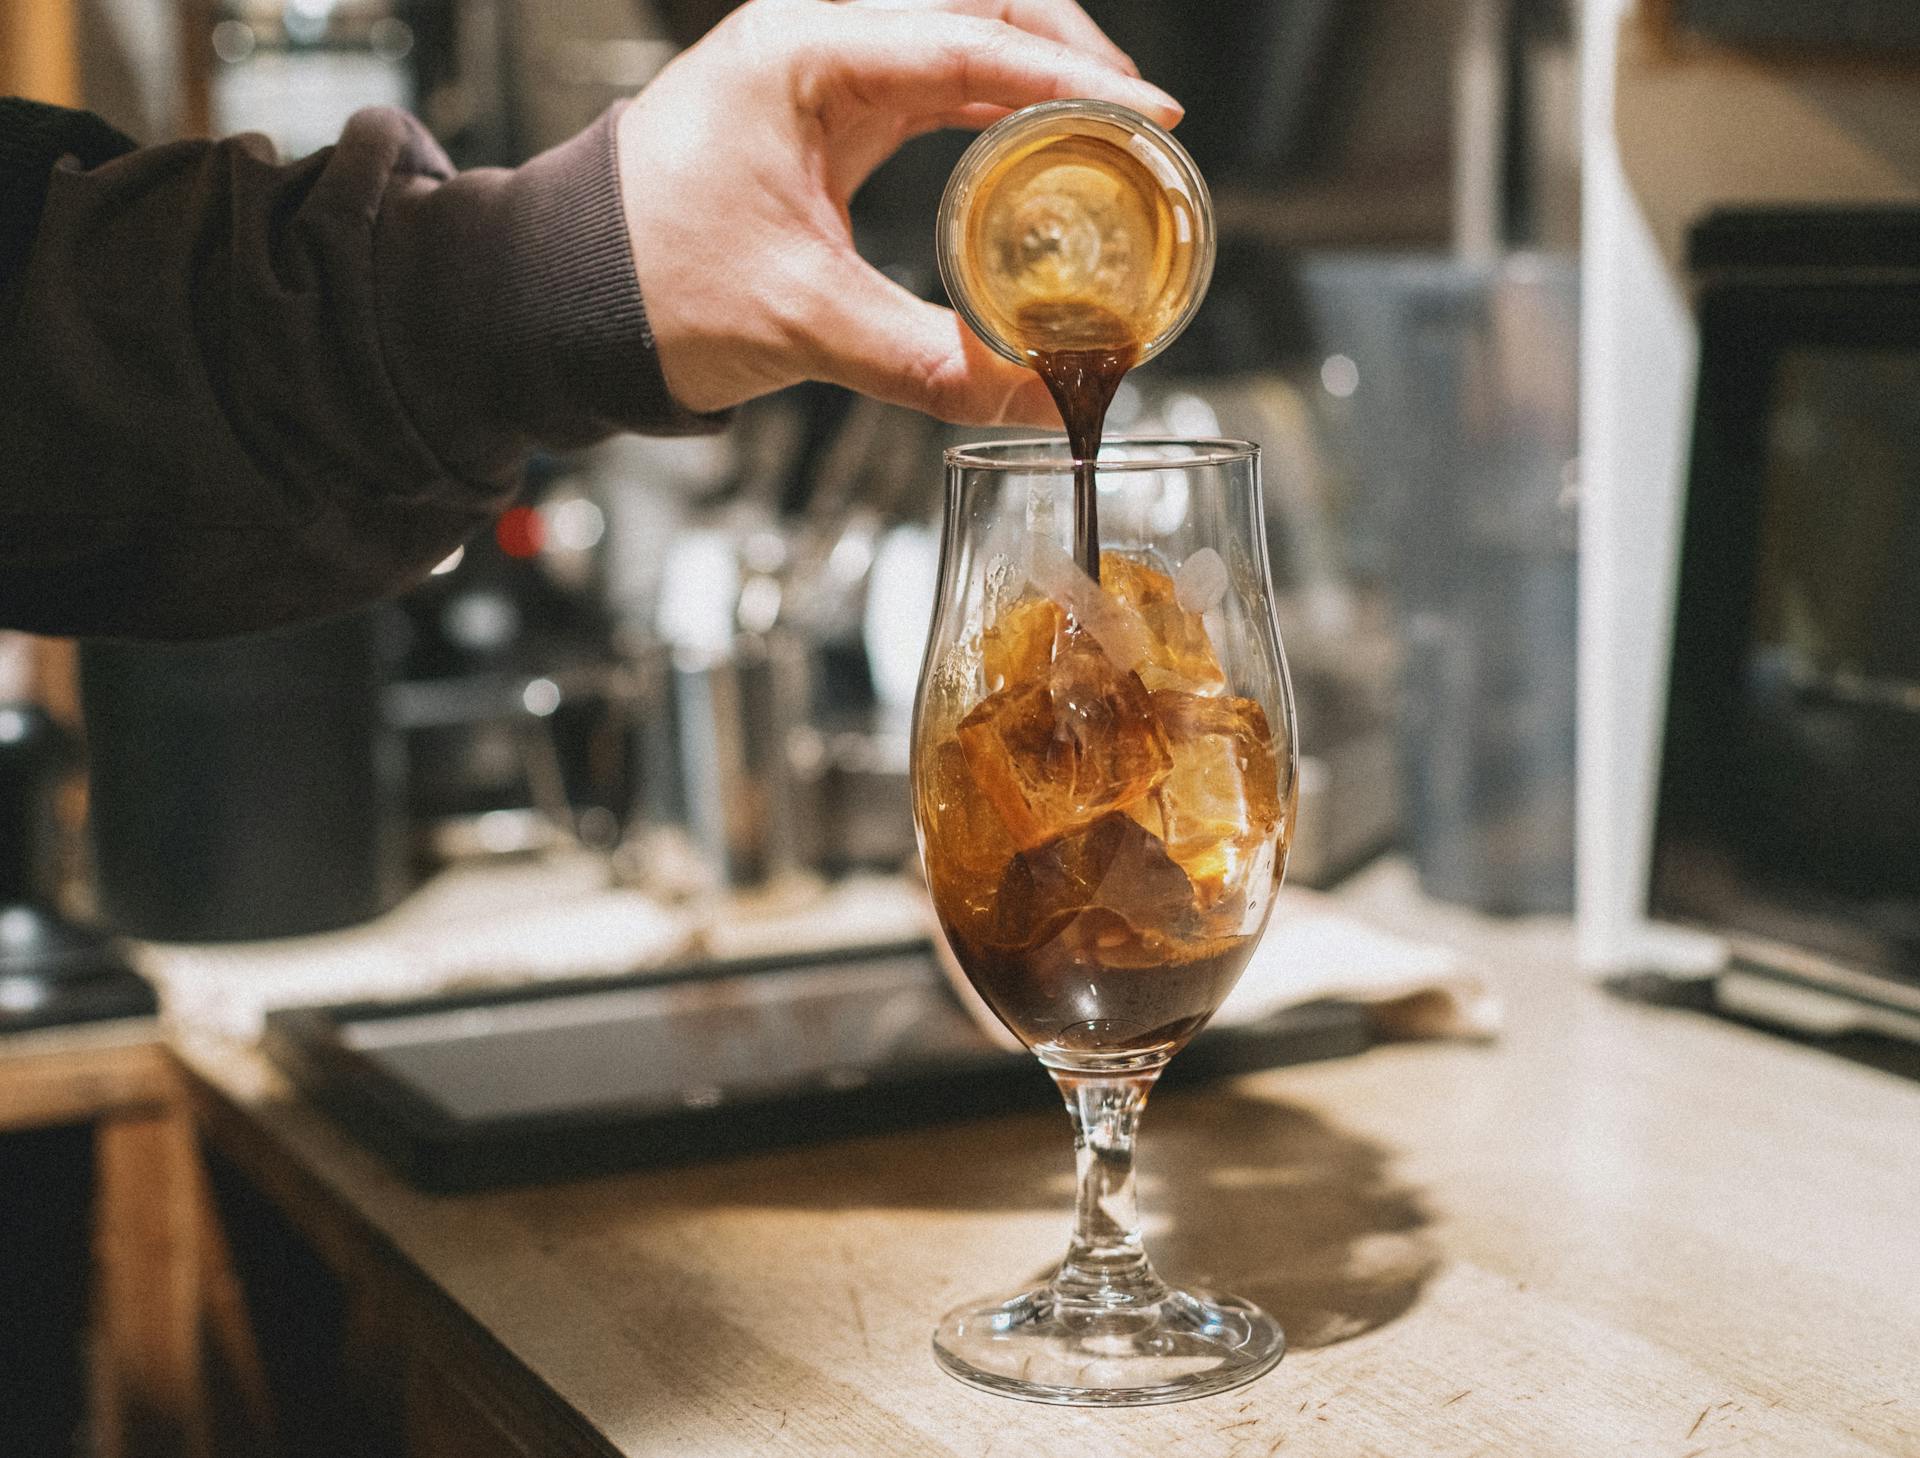
What is flash brew coffee? You brew hot coffee directly onto ice. The ice stops the cooking process. The flavors stay bright. The coffee cools instantly. No waiting 24 hours. No flat taste.
Let me show you exactly how it works. What you need to buy. And why you will never go back to cold brew.
Cold Brew vs Flash Brew: The Real Difference

Cold brew steeps grounds in cold water for 12 to 24 hours. No heat touches the beans. Flash brew pours hot water over grounds. The coffee drips directly onto ice.
Read Also: How Many Ounces In A Cup of Coffee?
Cold brew pros:
-
Smooth. Low acid.
-
Hard to mess up.
-
Makes large batches.
Cold brew cons:
-
Takes a full day.
-
Tastes flat. Lacks complexity.
-
Wastes beans. You need twice as much coffee.
Flash brew pros:
-
Takes 3 minutes.
-
Keeps the bean's original flavor.
-
Bright. Fruity. Clear.
-
Uses normal coffee ratios.
Flash brew cons:
-
Requires a gooseneck kettle.
-
Easy to mess up the ice ratio.
-
Best for one or two cups.
I tested both side by side. Same beans. Same grind. Blueberry. Jasmine. Lemon.
The difference is massive.
The Science of Flash Brewing Explained
Hot water extracts flavor compounds fast. Cold water extracts them slow. When you brew hot, you pull out the bright acids first. The citrus. The berry. The floral notes. Then you pour that hot coffee onto ice.
The ice stops extraction immediately. Those bright acids stay in the cup. Cold brew never extracts those bright acids. The cold water pulls out the heavy, smooth compounds only. That is why cold brew tastes flat.
The Japanese origin. Flash brew started in Japan. They call it "Japanese iced coffee." The Kyoto style uses a slow drip tower. The home style uses a regular pour-over setup.
The number you need. Replace half your brew water with ice. If your recipe calls for 300 grams of water, use 150 grams of hot water and 150 grams of ice.
I learned this the hard way. My first flash brew was watery. I used too much ice. The coffee diluted before it cooled.
The Gear You Actually Need
You do not need a fancy Kyoto tower.
Essential:
-
Gooseneck kettle ($40). Regular kettles pour too fast. You cannot control the flow. The coffee extracts unevenly.
-
Pour-over dripper ($25). Hario V60 or Chemex. Both work.
-
Filters ($10). Use bleached filters. Unbleached ones taste like paper.
-
Scale ($15). You need exact measurements. Eyeballing fails.
-
Coffee grinder ($50). Blade grinders suck. Buy a burr grinder. Timemore C2 costs $60. Worth it.
Nice to have:
-
Thermometer ($10). Water temp matters. 195°F to 205°F is the zone.
-
Glass carafe ($20). Server directly over ice.
What not to buy:
-
Flash brew coffee maker (generic). Most are overpriced V60 clones. Skip.
-
Automatic pour-over machines. Too expensive. Too slow.
I tested the Hario V60 and the Chemex. The V60 makes brighter cups. The Chemex makes cleaner cups. Both work fine. Pick the cheaper one.
Step by Step: Your First Flash Brew
Follow these numbers exactly.
Ingredients:
-
22 grams of coffee beans
-
200 grams of ice
-
200 grams of hot water
Step 1. Put 200 grams of ice in your carafe. Place it on the scale. Zero the scale.
Step 2. Grind your coffee. Medium-fine setting. Finer than drip. Coarser than espresso. The grind size matters more than anything.
You Must Also Like: Does Dunkin Frozen Coffee Have Caffeine?
Step 3. Boil water. Let it sit for 30 seconds after boiling. Target temp is 200°F.
Step 4. Put the filter in the dripper. Rinse it with hot water. This removes paper taste and warms the dripper.
Step 5. Add your ground coffee to the filter.
Step 6. Start pouring. Use a slow spiral motion. Pour 50 grams of water. Wait 30 seconds. The coffee blooms. You will see bubbles.
Step 7. Pour another 150 grams of water. Slow spiral again. Keep the water level steady.
Step 8. Wait for the dripping to finish. About 2 to 3 minutes.
Step 9. Stir the ice and coffee together. Serve immediately.
Too coarse. Too fine. Too much ice. Stick with it. By batch four, you will nail it.
The Best Beans for Flash Brew
Light roast beans work best. Dark roasts taste smoky and bitter when flash brewed. The ice concentrates the roast flavors. Not pleasant.
My top three tested beans:
1. Ethiopian Yirgacheffe. Tastes like blueberry and lemon. Flash brewing highlights the fruit. Cold brewing kills it.
2. Kenyan AA. Bright and wine-like. The acidity shines in flash brew.
3. Costa Rican honey process. Sweet and clean. Good for beginners.
Beans to avoid:
-
Dark roasts. Too bitter.
-
Old beans (roasted more than 4 weeks ago). Flat taste.
-
Pre-ground coffee. Grind size never matches flash brew needs.
I buy from local roasters only. The roast date matters. Look for beans roasted within 10 days.
The budget option. Happy Mug Coffee sells Ethiopian beans for $12 per pound. Good quality. Fair price.
Common Mistakes I Made (So You Do Not)
Mistake one. Using too little ice. The coffee stays warm.
Fix. Weigh your ice. Half the total water weight. Do not guess.
Mistake two. Pouring too fast. The water channels through the coffee. Some grounds get over-extracted. Others stay dry.
Fix. Use a gooseneck kettle. Pour in slow circles. Watch James Hoffmann's video on pour technique. Fifteen minutes of learning saves months of bad coffee.
Mistake three. Using tap water. Chlorine kills coffee flavor.
Fix. Filtered water only. A Brita pitcher works fine.
Mistake four. Serving flash brew over fresh ice. The second ice melts and dilutes the coffee again.
Fix. Chill a separate glass. No ice in the serving glass. Or use whiskey stones.
Mistake five. Letting flash brew sit. Flash brew degrades fast. The ice melts. The flavors fade.
Fix. Drink within 10 minutes. Flash brew is not cold brew. You cannot store it.
Flash Brew vs Iced Pour Over vs Cold Brew
People mix these up. Let me clear it up.
Iced pour over. Same as flash brew. Different name. Both brew hot onto ice.
Cold brew. Steeps cold for 12+ hours. Different process. Different taste.
Nitro cold brew. Cold brew infused with nitrogen. Creamy texture. Also flat tasting.
Flash brew maker. Any pour-over setup. No special machine needed.
Cold brew coffee Chemex. You can make cold brew in a Chemex. But why? The Chemex shines for hot pour over and flash brew.
The ranking for flavor:
-
Flash brew (bright, complex)
-
Iced pour over (same as flash)
-
Nitro cold brew (creamy but flat)
-
Cold brew (flat)
The ranking for convenience:
-
Cold brew (make once, drink all week)
-
Flash brew (3 minutes per cup)
-
Nitro cold brew (needs special setup)
Pick flash brew for taste. Pick cold brew for meal prep.
The Best Flash Brew Coffee Maker Options
You do not need a dedicated machine. But if you want one, here are the tested options.
Hario V60 Drip Decanter. $35. Comes with a glass carafe. Works perfectly. My daily driver.
Chemex 6-Cup. $45. Thicker filters. Cleaner cup. Takes longer to brew.
Kalita Wave. $40. Flat bottom. More forgiving than V60. Good for beginners.
Hario Mizudashi. $25. Made for cold brew. Do not buy this for flash brew. Wrong tool.
Generic "Japanese iced coffee maker." $50 to $150. Skip these. They are rebranded V60s with higher prices.
My recommendation. Buy the Hario V60 starter kit. $35. Includes dripper, carafe, and 100 filters. Best value.
The splurge. Fellow Stagg XF. $65. Beautiful design. Great heat retention. Unnecessary but nice.
How to Scale Flash Brew for a Crowd?
Flash brew makes one or two cups at a time. That is its weakness. But I hosted a brunch for eight people. Here is how I handled it.
Method one. Brew concentrated flash brew.
Method two. Brew multiple batches back to back. Rinse the filter between batches. Keep the first batch in a thermal carafe. It stays cold for 30 minutes.
Method three. Make cold brew for the crowd. Flash brew for yourself. Honesty works.
I used method one for my brunch. Everyone asked for seconds. Nobody noticed it was concentrate.
The ratio for concentrate. 1:5 coffee to water. 30 grams coffee, 150 grams water, 150 grams ice. Dilute 1 part concentrate with 2 parts water.
The Cost Comparison
Cold brew wastes beans. Flash brew uses normal ratios.
Cold brew: 1 pound of beans makes 6 cups of concentrate. Cost per cup: $2.50 (using $15/lb beans).
Flash brew: 1 pound of beans makes 20 cups. Cost per cup: $0.75.
Starbucks iced coffee: $3.50 per cup.
Starbucks cold brew: $4.50 per cup.
Over a year, flash brew saves you $500 compared to Starbucks. Compared to cold brew, it saves you $350.
The hidden cost. You buy a gooseneck kettle and a dripper. One-time $60 investment. Pays for itself in two months.
What the Coffee Experts Say?
James Hoffmann tested flash brew against cold brew. His verdict: Japanese iced coffee preserves the qualities of the coffee that cold brew often loses.
Scott Rao agrees. He calls flash brew "superior in every way except convenience. The Specialty Coffee Association includes flash brew in their brewing standards. They recommend a 1:15 ratio with 40 percent of the water as ice.
I tested the SCA ratio. 1:15 coffee to total water. 40 percent ice. 60 percent hot water. Works perfectly.
The recipe: 20 grams coffee, 240 grams total water. 96 grams ice, 144 grams hot water.
The Final Thoughts
What is flash brew coffee? Hot coffee brewed directly onto ice. Takes three minutes. Tastes bright and clean. Keeps the bean's original flavor. Cold brew is easier. Flash brew is better.
Buy a Hario V60. Buy a gooseneck kettle. Buy light roast Ethiopian beans. Weigh your water and ice. Your first cup might be watery. Your second cup might be bitter. Your third cup will click.
After that, you will never make cold brew again. I know I do not.